서버사이드 렌더링 구현하기
자, 이제 우리가 방금 만든 프로젝트를 기반으로 서버사이드 렌더링을 구현해봅시다. 서버사이드 렌더링을 구현하려면 웹팩 설정을 커스터마이징 해야합니다. CRA 로 만든 프로젝트에서는 웹팩 관련 설정들이 기본적으로는 숨겨져있으니 yarn eject 명령어를 실행하여 밖으로 꺼내주세요.
$ git add .
$ git commit -m'Commit before eject'
$ yarn eject

? Are you sure you want to eject? This action is permanent. (y/N) y
서버사이드 렌더링 엔트리 만들기
엔트리(entry) 라는 것은, 웹팩에서 프로젝트를 처리 할 때 가장 먼저 불러오기 시작하는 파일입니다. 예를 들어서, 현재 우리의 리액트 프로젝트에서는 index.js 를 엔트리 파일로 사용하여 그 파일부터 시작해서 필요한 다른 컴포넌트 및 모듈들을 불러와주죠.
서버사이드 렌더링을 할 때에는 서버쪽에서 실행할 엔트리 파일을 따로 만들어주어야합니다. src 디렉터리에 index.server.js 라는 파일을 생성하세요.
index.server.js
import React from 'react';
import ReactDOMServer from 'react-dom/server';

const html = ReactDOMServer.renderToString(
  <div>Hello Server Side Rendering!</div>
);

console.log(html);
지금은 일단 가장 기본적인 코드만 작성해주었습니다. 서버쪽에서 리액트 컴포넌트를 렌더링 할 때에는 renderToString 이라는 함수를 사용합니다. 이 함수에 JSX 를 넣어서 호출해주면 렌더링 결과를 문자열로 반환해줍니다.
서버사이드 렌더링 전용 웹팩 환경설정 작성하기
이제 위 엔트리 파일을 웹팩으로 처리하기 위하여 환경설정을 작성해줄 것입니다. 먼저 config 경로의 paths.js 파일을 열어서 스크롤을 맨 아래로 내린 뒤 다음과 같이 수정해주세요.
config/paths.js
(...)

module.exports = {
  dotenv: resolveApp('.env'),
  appPath: resolveApp('.'),
  appBuild: resolveApp('build'),
  appPublic: resolveApp('public'),
  appHtml: resolveApp('public/index.html'),
  appIndexJs: resolveModule(resolveApp, 'src/index'),
  appPackageJson: resolveApp('package.json'),
  appSrc: resolveApp('src'),
  appTsConfig: resolveApp('tsconfig.json'),
  yarnLockFile: resolveApp('yarn.lock'),
  testsSetup: resolveModule(resolveApp, 'src/setupTests'),
  proxySetup: resolveApp('src/setupProxy.js'),
  appNodeModules: resolveApp('node_modules'),
  publicUrl: getPublicUrl(resolveApp('package.json')),
  servedPath: getServedPath(resolveApp('package.json')),
  // 서버사이드 렌더링을 위한 경로
  ssrIndexJs: resolveApp('src/index.server.js'), // 엔트리
  ssrBuild: resolveApp('dist'), // 웹팩 처리 후 저장 경로
};


module.exports.moduleFileExtensions = moduleFileExtensions;
그 다음엔, 환경 설정 파일을 작성해주겠습니다. config 디렉터리에 webpack.config.server.js 라는 파일을 생성해주세요.
config/webpack.config.server.js
const paths = require('./paths');

module.exports = {
  mode: 'production',
  entry: paths.ssrIndexJs,
  target: 'node',
  output: {
    path: paths.ssrBuild,
    filename: 'server.js',
    chunkFilename: 'js/[name].chunk.js'
  }
};
지금은 일단 엔트리 파일과, 처리 완료 후 저장 경로를 설정해주었습니다.
그 다음 해야 할 일은 로더를 설정해주는 것 입니다. 로더는 파일들을 불러올 때 확장자에 따라 알맞게 처리를 해줍니다.
config/webpack.config.server.js
const paths = require('./paths');

const cssRegex = /\.css$/;
const cssModuleRegex = /\.module\.css$/;
const sassRegex = /\.(scss|sass)$/;
const sassModuleRegex = /\.module\.(scss|sass)$/;

module.exports = {
  mode: 'production',
  entry: paths.ssrIndexJs,
  target: 'node',
  output: {
    path: paths.ssrBuild,
    filename: 'server.js',
    chunkFilename: 'js/[name].chunk.js'
  },
  module: {
    rules: [
      {
        oneOf: [
          // 자바스크립트를 위한 처리
          // 기존 webpack.config.js 를 참고하여 작성
          {
            test: /\.(js|mjs|jsx|ts|tsx)$/,
            include: paths.appSrc,
            loader: require.resolve('babel-loader'),
            options: {
              customize: require.resolve(
                'babel-preset-react-app/webpack-overrides'
              ),
              plugins: [
                [
                  require.resolve('babel-plugin-named-asset-import'),
                  {
                    loaderMap: {
                      svg: {
                        ReactComponent: '@svgr/webpack?-svgo![path]'
                      }
                    }
                  }
                ]
              ],
              cacheDirectory: true,
              cacheCompression: false,
              compact: false
            }
          },
          // CSS 를 위한 처리
          {
            test: cssRegex,
            exclude: cssModuleRegex,
            // css-loader/locals 를 사용해야 실제 css 파일을 생성하지 않습니다.
            loader: require.resolve('css-loader/locals')
          },
          // CSS Module 을 위한 처리
          {
            test: cssModuleRegex,
            loader: require.resolve('css-loader/locals'),
            options: {
              modules: true
            }
          },
          // Sass 를 위한 처리
          {
            test: sassRegex,
            exclude: sassModuleRegex,
            use: [
              require.resolve('css-loader/locals'),
              require.resolve('sass-loader')
            ]
          },
          // Sass + CSS Module 을 위한 처리
          {
            test: sassRegex,
            exclude: sassModuleRegex,
            use: [
              {
                loader: require.resolve('css-loader/locals'),
                options: {
                  modules: true
                }
              },
              require.resolve('sass-loader')
            ]
          },
          // url-loader 를 위한 설정
          {
            test: [/\.bmp$/, /\.gif$/, /\.jpe?g$/, /\.png$/],
            loader: require.resolve('url-loader'),
            options: {
              emitFile: false, // 이 설정이 중요합니다.
              limit: 10000, // 원래는 9.76KB가 넘어가면 파일로 저장하는데
              // emitFile 값이 false 일땐 경로만 준비하고 파일은 저장하지 않습니다.
              name: 'static/media/[name].[hash:8].[ext]'
            }
          },
          // 위에서 설정된 확장자를 제외한 파일들은
          // file-loader 를 사용합니다.
          {
            loader: require.resolve('file-loader'),
            exclude: [/\.(js|mjs|jsx|ts|tsx)$/, /\.html$/, /\.json$/],
            options: {
              emitFile: false, // 파일을 저장하지 않습니다.
              name: 'static/media/[name].[hash:8].[ext]'
            }
          }
        ]
      }
    ]
  }
};
이제는 node_modules 에서 모듈을 불러오는 것을 위한 설정을 해줄 것입니다.
config/webpack.config.server.js
const paths = require('./paths');

const cssRegex = /\.css$/;
const cssModuleRegex = /\.module\.css$/;
const sassRegex = /\.(scss|sass)$/;
const sassModuleRegex = /\.module\.(scss|sass)$/;

module.exports = {
  mode: 'production',
  entry: paths.ssrIndexJs,
  target: 'node',
  output: {
    path: paths.ssrBuild,
    filename: 'server.js',
    chunkFilename: 'js/[name].chunk.js'
  },
  module: {
    rules: [
      (...)
    ]
  },
  resolve: {
    modules: ['node_modules']
  }
};
이 설정을 해주면 우리가 import 구문을 사용하여 node_modules 안에 있는 라이브러리를 불러올 수 있게 됩니다. 만약에 우리가 React 라이브러리를 불러와서 사용하게 되면 결과물 파일 안에 React 라이브러리 관련 코드가 포함이 됩니다. 브라우저에서 사용 할 땐 이렇게 결과물 파일에 리액트 라이브러리와 우리의 애플리케이션에 관한 코드가 함께 있을 필요가 있는데요, 서버에서 사용 할 때는 굳이 파일 안에 들어가있을 필요가 없습니다.
이런 상황에서는, webpack-node-externals 라는 것을 사용하여 node_modules 안에 있는 파일들은 결과물 파일 안에 들어가지 않게 하도록 설정해줄 수 있습니다. 이를 통하여 추후 웹팩의 처리 시간을 단축시켜줄 수 있습니다.
config/webpack.config.server.js
const nodeExternals = require('webpack-node-externals');
const paths = require('./paths');

const cssRegex = /\.css$/;
const cssModuleRegex = /\.module\.css$/;
const sassRegex = /\.(scss|sass)$/;
const sassModuleRegex = /\.module\.(scss|sass)$/;

module.exports = {
  mode: 'production',
  entry: paths.ssrIndexJs,
  target: 'node',
  output: {
    path: paths.ssrBuild,
    filename: 'server.js',
    chunkFilename: 'js/[name].chunk.js'
  },
  module: {
    rules: [
      (...)
    ]
  },
  resolve: {
    modules: ['node_modules']
  },
  externals: [nodeExternals()]
};
중요한 설정은 모두 끝내주었습니다! 이제 마지막으로 환경 변수들을 주입해주는 작업을 해주겠습니다.
const nodeExternals = require('webpack-node-externals');
const webpack = require('webpack');
const getClientEnvironment = require('./env');
const paths = require('./paths');

const cssRegex = /\.css$/;
const cssModuleRegex = /\.module\.css$/;
const sassRegex = /\.(scss|sass)$/;
const sassModuleRegex = /\.module\.(scss|sass)$/;

const publicUrl = paths.servedPath.slice(0, -1);
const env = getClientEnvironment(publicUrl);

module.exports = {
  mode: 'production',
  entry: paths.ssrIndexJs,
  target: 'node',
  output: {
    path: paths.ssrBuild,
    filename: 'server.js',
    chunkFilename: 'js/[name].chunk.js'
  },
  module: {
    rules: [
      (...)
    ]
  },
  resolve: {
    modules: ['node_modules']
  },
  externals: [nodeExternals()],
  plugins: [
    new webpack.DefinePlugin(env.stringified) // 환경변수를 주입해줍니다.
  ]
};
이제 환경설정이 모두 끝났습니다!
최종 결과물: https://gist.github.com/velopert/1f6abf743d882bc73aa46418c6ded8c2
빌드 스크립트 작성하기
우리가 방금 만든 환경 설정을 사용하여 웹팩으로 빌드를 하는 스크립트를 작성해보겠습니다. scripts 경로에 build.server.js 라는 파일을 생성해서 다음 코드를 입력하세요.
scripts/build.server.js
process.env.BABEL_ENV = 'production';
process.env.NODE_ENV = 'production';

process.on('unhandledRejection', err => {
  throw err;
});

require('../config/env');
const fs = require('fs-extra');
const webpack = require('webpack');
const config = require('../config/webpack.config.server');
const paths = require('../config/paths');

function build() {
  console.log('Creating an optimized production build...');
  fs.emptyDirSync(paths.ssrBuild);
  let compiler = webpack(config);
  return new Promise((resolve, reject) => {
    compiler.run((err, stats) => {
      if (err) {
        console.log(err);
        return;
      }
      console.log(stats.toString());
    });
  });
}

build();
그 다음에는 package.json 을 열어서 build:server 라는 스크립트와 start:server 라는 스크립트를 추가하세요.
package.json - scripts
  "scripts": {
    "start": "node scripts/start.js",
    "build": "node scripts/build.js",
    "start:server": "node dist/server.js",
    "build:server": "node scripts/build.server.js",
    "test": "node scripts/test.js"
  },
이제 다음 명령어들을 입력해보세요.
$ yarn build:server

Creating an optimized production build...
Hash: 0c9cc972abba60b60cb0
Version: webpack 4.28.3
Time: 130ms
Built at: 2019-03-03 21:06:48
    Asset      Size  Chunks             Chunk Names
server.js  1.15 KiB       0  [emitted]  main
Entrypoint main = server.js
[0] external "react" 42 bytes {0} [built]
[1] external "react-dom/server" 42 bytes {0} [built]
[2] ./src/index.server.js 200 bytes {0} [built]

$ yarn start:server

<div data-reactroot="">Hello Server Side Rendering!</div>
이제 본격적으로 서버사이드 렌더링을 구현 할 준비가 끝났습니다!
서버 코드 작성하기
서버사이드 렌더링을 처리 할 서버를 작성해봅시다. 우리는 Express 를 사용하여 웹서버를 만들어주도록 하겠습니다.
$ yarn add express
이제 index.server.js 를 다음과 같이 작성해주세요.
index.server.js
import React from 'react';
import ReactDOMServer from 'react-dom/server';
import express from 'express';
import { StaticRouter } from 'react-router';
import App from './App';

const app = express();

// 서버사이드 렌더링을 처리 할 핸들러 함수입니다.
const serverRender = (req, res, next) => {
  // 이 함수는 404가 떠야 하는 상황에 404를 띄우지 않고 서버사이드 렌더링을 해줍니다.
  if (req.route) return next();

  const context = {};
  const jsx = (
    <StaticRouter location={req.url} context={context}>
      <App />
    </StaticRouter>
  );
  const root = ReactDOMServer.renderToString(jsx); // 렌더링을 하고
  res.send(root); // 결과물을 응답합니다.
};

app.use(serverRender);

// 5000 포트로 서버를 가동합니다.
app.listen(5000, () => {
  console.log('Running on http://localhost:5000');
});
지금 당장은 .js 파일과 .css 파일을 제공하는 것은 생략하고 렌더링 결과를 브라우저상에 보여주는 것 까지만 처리하였습니다. 한번 결과물을 확인해봅시다. 결과물을 확인할 땐 다음과 같이 서버를 빌드하고 실행하세요.
$ yarn build:server
$ yarn start:server
그 다음에 http://localhost:5000 에 들어가서 Red / Blue 링크를 눌러보세요.
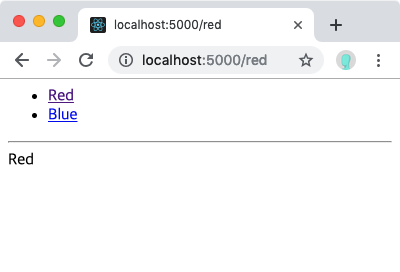
Red 혹은 Blue 페이지에 들어가면 위 이미지와 같이 스타일이 입혀지지 않은 상태로 나타날 것입니다. 지금은 자바스크립트와 CSS 가 로딩되지 않고 그저 html 만 보여주고있는 상태입니다.
이제 express.static 을 사용하여 build 에 있는 디렉토리 안의 파일들을 서버를 통해 접근 할 수 있도록 해줍시다.
import React from 'react';
import ReactDOMServer from 'react-dom/server';
import express from 'express';
import path from 'path';
import { StaticRouter } from 'react-router';
import App from './App';

const app = express();

// 서버사이드 렌더링을 처리 할 핸들러 함수입니다.
const serverRender = (req, res, next) => {
  // 이 함수는 404가 떠야 하는 상황에 404를 띄우지 않고 서버사이드 렌더링을 해줍니다.
  if (req.route) return next();

  const context = {};
  const jsx = (
    <StaticRouter location={req.url} context={context}>
      <App />
    </StaticRouter>
  );
  const root = ReactDOMServer.renderToString(jsx); // 렌더링을 하고
  res.send(root); // 결과물을 응답합니다.
};

app.use(
  express.static(path.resolve('./build'), {
    index: false // "/" 경로에서 index.html 을 보여주지 않고 서버사이드 렌더링을 합니다.
  })
);
app.use(serverRender);

// 5000 포트로 서버를 가동합니다.
app.listen(5000, () => {
  console.log('Running on http://localhost:5000');
});
주의 하실 점은, serverRender 를 express.static 이 사용되고 난 후에 적용해주셔야 합니다. 만약에 순서가 반대로 되면 나중에 정적 파일들이 제대로 제공되지 않게됩니다.
그 다음엔 우리가 렌더링 한 결과물을 자바스크립트와 CSS 가 로딩된 html 안에 삽입하고 나서 보여주어야 하는데요, 파일이름은 매번 빌드 할 때마다 바뀌기 때문에 빌드하고 나서 만들어지는 asset-manifest.json 파일을 읽어와서 이 객체를 참고하여 파일들을 불러오는 태그를 작성해주어야 합니다.
한번 yarn build 명령어를 입력하고 나서 asset-manifest.json 에는 어떤 내용들이 있는지 확인해보고 다음 코드를 작성하세요.
index.server.js
import React from 'react';
import ReactDOMServer from 'react-dom/server';
import express from 'express';
import path from 'path';
import { StaticRouter } from 'react-router';
import fs from 'fs';
import App from './App';

const app = express();

// asset-manifest.json 에서 파일 경로들을 조회합니다.
const manifest = JSON.parse(
  fs.readFileSync(path.resolve('./build/asset-manifest.json'), 'utf8')
);

// .js 로 끝나는 파일들에 대한 경로들을 추출하고 스크립트 태그로 변환합니다.
const scripts = Object.keys(manifest)
  .filter(name => /.js$/.exec(name))
  .map(name => `<script src="${manifest[name]}"></script>`)
  .join('');

// 서버사이드 렌더링된 결과에 따라 html 을 조합해서 보여줍니다.
function createPage(root) {
  return `<!DOCTYPE html>
<html lang="en">
<head>
  <meta charset="utf-8" />
  <link rel="shortcut icon" href="/favicon.ico" />
  <meta
    name="viewport"
    content="width=device-width,initial-scale=1,shrink-to-fit=no"
  />
  <meta name="theme-color" content="#000000" />
  <title>React App</title>
  <link href="${manifest['main.css']}" rel="stylesheet" />
</head>
<body>
  <noscript>You need to enable JavaScript to run this app.</noscript>
  <div id="root">
    ${root}
  </div>
  ${scripts}
</body>
</html>
  `;
}

// 서버사이드 렌더링을 처리 할 핸들러 함수입니다.
const serverRender = (req, res, next) => {
  // 이 함수는 404가 떠야 하는 상황에 404를 띄우지 않고 서버사이드 렌더링을 해줍니다.
  if (req.route) return next();

  const context = {};
  const jsx = (
    <StaticRouter location={req.url} context={context}>
      <App />
    </StaticRouter>
  );
  const root = ReactDOMServer.renderToString(jsx); // 렌더링을 하고
  res.send(createPage(root)); // 결과물을 응답합니다.
};

app.use(
  express.static(path.resolve('./build'), {
    index: false // "/" 경로에서 index.html 을 보여주지 않고 서버사이드 렌더링을 합니다.
  })
);
app.use(serverRender);

// 5000 포트로 서버를 가동합니다.
app.listen(5000, () => {
  console.log('Running on http://localhost:5000');
});
서버를 새로 빌드하고 나서 다시 브라우저로 http://localhost:5000/ 에 들어가보세요. 링크를 눌렀을 때 스타일이 제대로 입혀져있나요?